Marble Mechanics 813-625-3377
Floor maintenance tips

Saltillo Tile Maintenance

A Guide for Florida Homes

It is clay. It is handmade. Treat it accordingly. The sealer is the only thing standing between the clay and everything you spill, drop or drag across it, so every habit in this guide exists to protect the sealer.

By Oscar Tineo 14 minute read

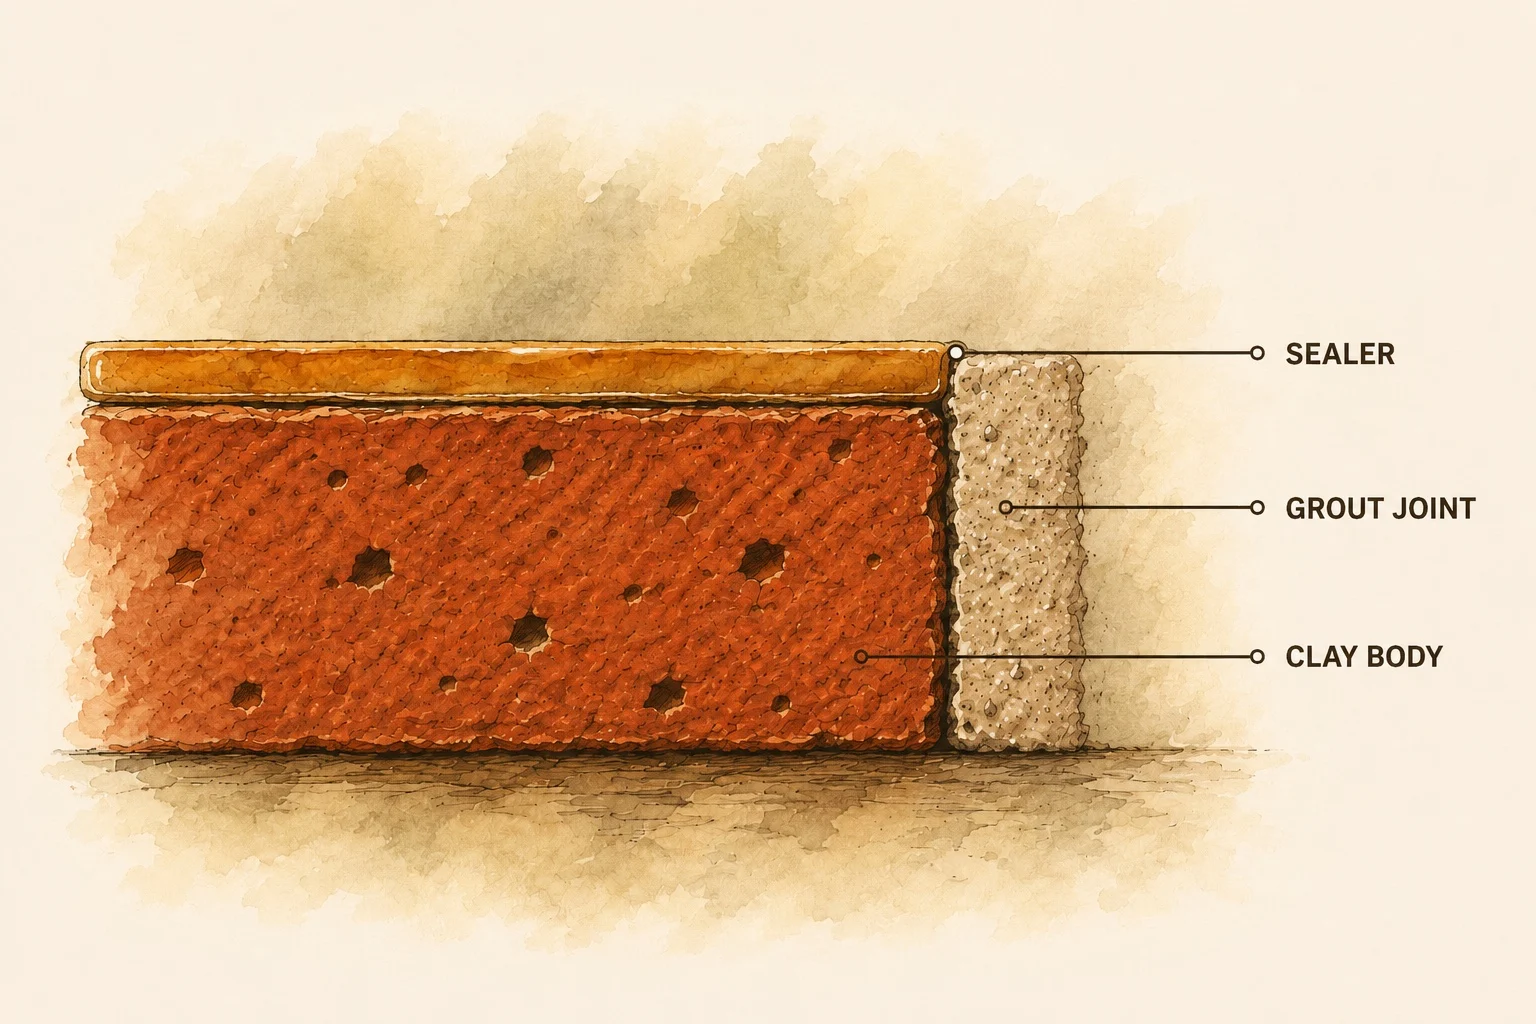
Cross-section of a sealed Saltillo tile showing the clay body, the sealer layer and the grout joint

Saltillo is handmade clay tile. It is softer and more porous than porcelain, ceramic, marble, travertine or granite. Because of that, the sealer is the most important thing on the floor. It is the only thing standing between the clay and everything you spill, drop or drag across it.

Saltillo is a fired clay tile rather than a stone, so the standards that govern it are tile standards. The Tile Council of North America is the reference for installation and grout, and it is worth knowing which rules apply to your floor before buying anything to put on it.

This guide assumes your Saltillo has been sealed with a gloss protective surface finish. That kind of sealer enhances the color and helps the tile resist stains, dirt, grease, scuffs and scratches. It still needs gentle care. Every habit below exists to protect the finish: not to strip it, soften it, scratch it or overheat it.

Understanding Saltillo Tile

What makes Saltillo different

  • It is very porous before sealing.
  • It can absorb water, oils, spills and cleaning chemicals.
  • It can scratch or dull when cleaned with abrasive tools.
  • The finish wears down in high-traffic areas.
  • Grout lines collect dirt faster than the tile surface.
  • Moisture left sitting on Saltillo can cause haze, staining or sealer problems.

Important

The simple rule

If a product does not say it is safe for sealed tile, Saltillo or stone, do not use it. That one habit prevents most of the damage we are called out to repair.

Daily and Weekly Cleaning

Remove the dirt. Do not soak the tile. Saltillo should be cleaned gently, and the right tools matter as much as the right product.
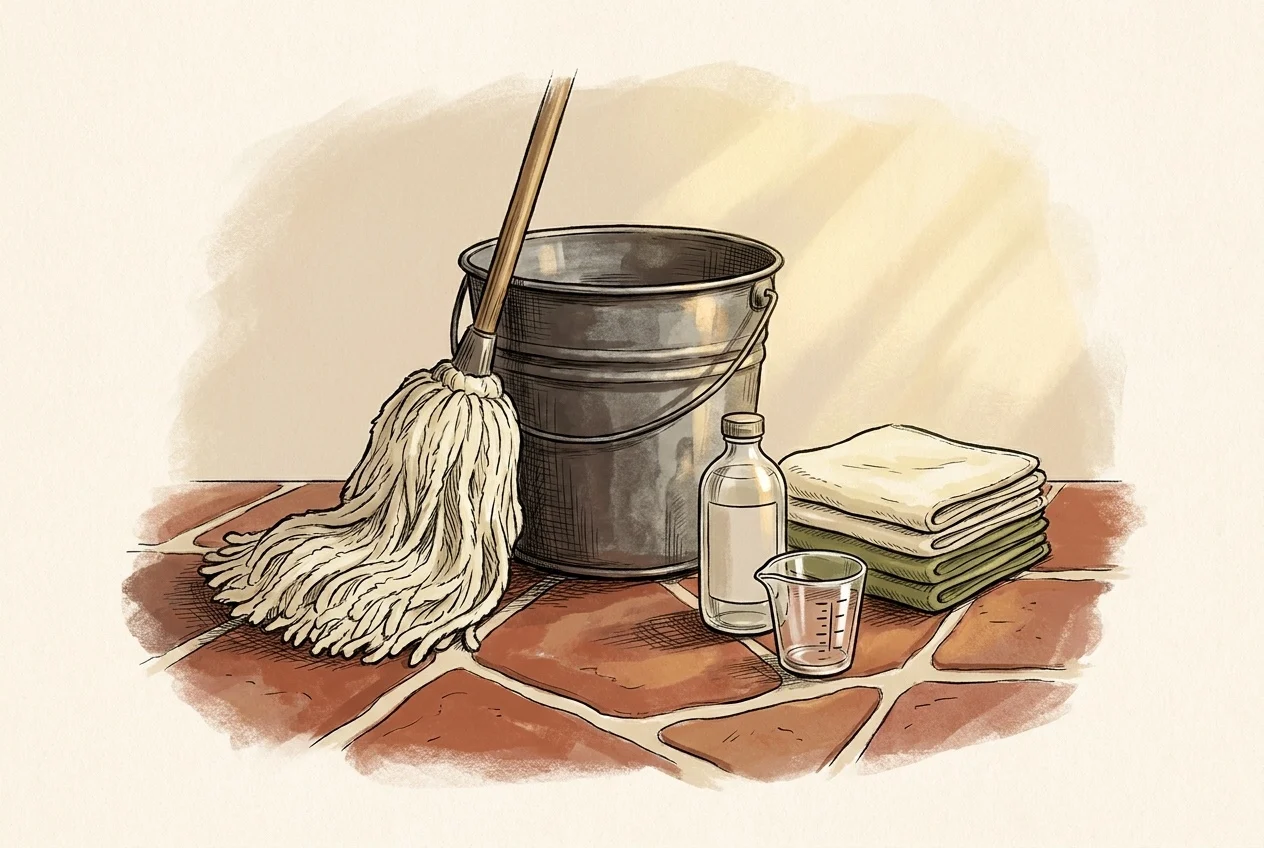
Microfiber mop, bucket, measuring cup and folded cloths for cleaning Saltillo tile
The whole kit. Nothing on this list is expensive and nothing on it is optional.

Tools you want

  • A soft broom, dust mop, or vacuum with a hard-floor setting
  • A microfiber mop
  • A clean bucket
  • A dry microfiber towel for the finishing pass

Cleaner

Use a pH neutral cleaner labeled safe for sealed tile, Saltillo or natural stone. You may also use a mild, properly diluted ammonia solution.

Common question

The mild ammonia solution, and how mild is mild

For routine cleaning, 1 to 2 tablespoons of clear household ammonia per gallon of clean water. For a larger bucket, a quarter cup per 2 to 3 gallons. Clear household ammonia only. Never straight ammonia, and never mixed with bleach or any other cleaner. Mop lightly, do not let it dwell, and dry the floor immediately. On Saltillo the mix has to stay light: a heavy solution will dull the sealer, which is the layer doing all the work.

Avoid strong degreasers, acidic cleaners, bleach, heavy ammonia mixtures and all-purpose sprays unless Marble Mechanics has specifically recommended them for your finish.

The steps

  1. Sweep or dust-mop first.
  2. Mix a small amount of pH neutral cleaner with clean water, or the diluted ammonia formula above.
  3. Lightly dampen the mop. The mop should be damp, not dripping.
  4. Mop gently in sections. Do not flood the floor.
  5. Rinse lightly if needed.
  6. Dry with a clean microfiber towel.

Do not let water air-dry on Saltillo. Drying prevents streaks, haze, mineral spots and moisture sitting in the grout lines.

Do not drag the cleaning bucket across the floor. Lift it, carry it, set it on a towel, or keep it outside the work area. A bucket dragged across sealed Saltillo grinds grit into the finish and leaves scratches.

Do not use hot water, steam, heated wet mops or any heat-based appliance. Heat can soften, haze or damage the sealer.

Vacuuming Safely

Suction is fine. Spinning brushes are not. Vacuuming is safe on Saltillo only when the vacuum is set up for hard floors: anything that drags or spins against the tile is grinding the sealer down while it pretends to clean.
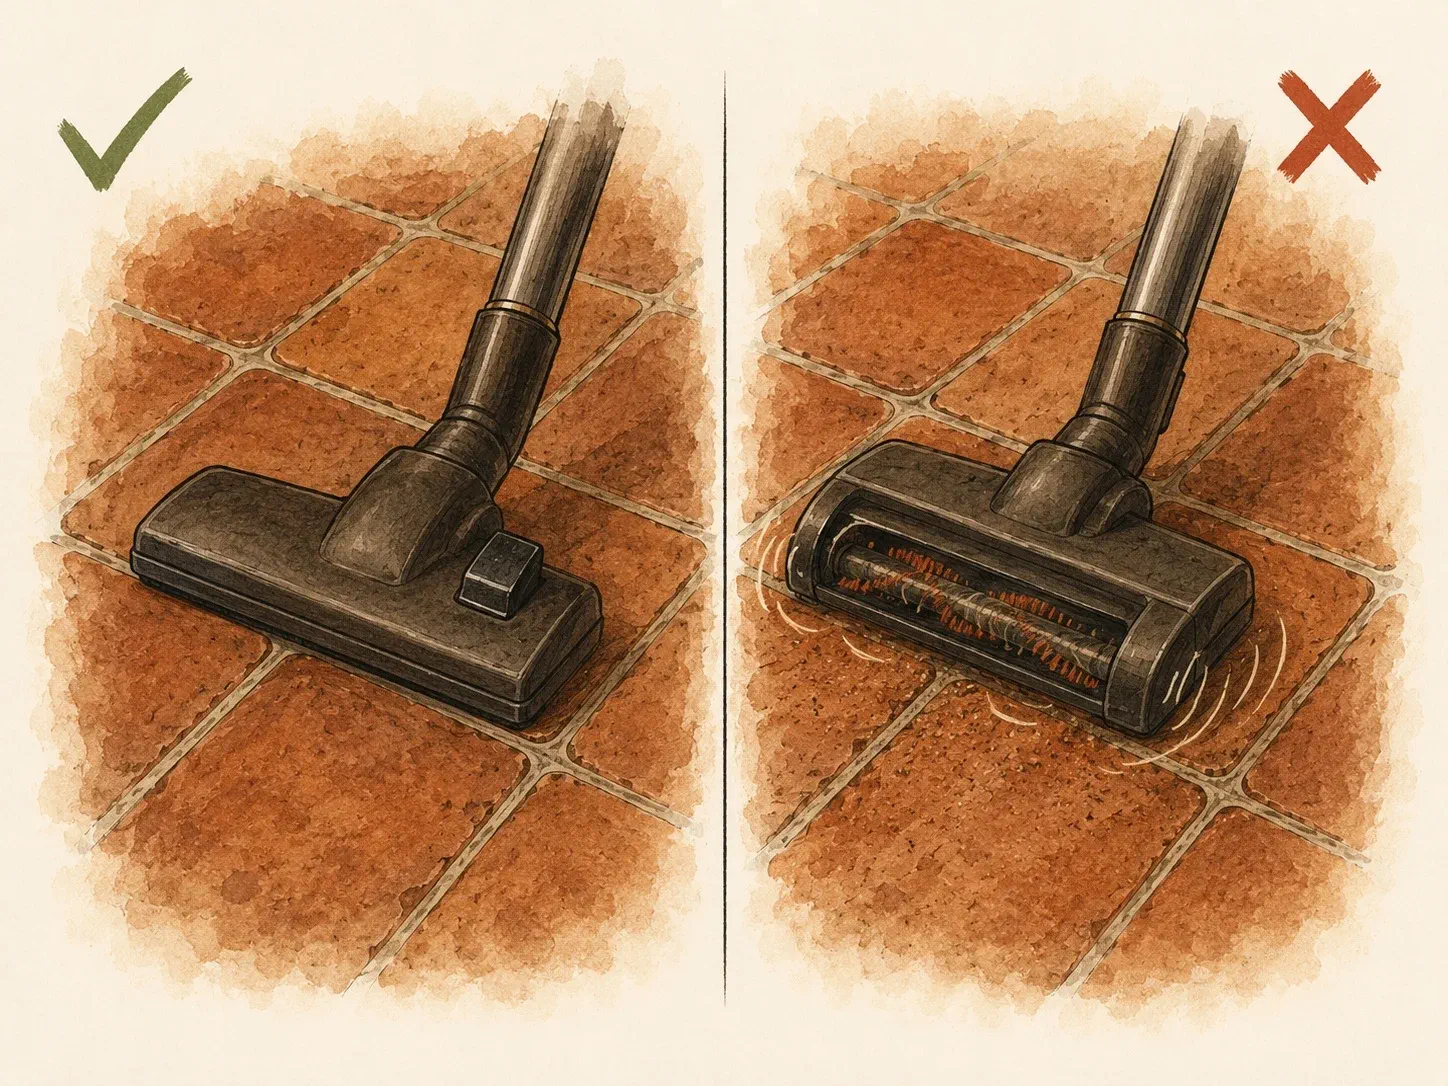
Vacuum head with the roller off beside a spinning beater bar marked as unsafe for Saltillo
Left, roller off and suction only. Right, spinning bristles abrading the sealer.

Use:

  • Suction-only hard-floor mode
  • A soft floor brush attachment
  • A vacuum with the brush roller turned off
  • Clean wheels with no grit caught in them

Avoid:

  • Beater bars and spinning brush rollers
  • Stiff roller brushes
  • Dirty wheels, or hard plastic wheels with grit embedded in them
  • Robot vacuums whose wheels or rollers drag, rub or leave marks

Some vacuums keep spinning the roller even in hard-floor mode. That friction acts like a fine abrasive pad, scratching the sealer while the vacuum does its work. If the roller cannot be turned off, that vacuum should not be used on your Saltillo.

Spot-Cleaning Spills

The sealer helps. Speed helps more. Sealed Saltillo gives you time, but not all of it.

Illustration of common Saltillo tile spills: wine, coffee, citrus, pets and plant pot moisture
The usual suspects, and the moisture trapped under a houseplant.
  1. Blot the spill immediately. Do not wipe and smear.
  2. Use a soft cloth or paper towel.
  3. If residue remains, clean it with a pH neutral cleaner.
  4. Dry the area fully.

Watch closely for: cooking oil, wine, coffee, citrus, pet accidents, mud, metal can rings and plant pot moisture.

Even sealed Saltillo will stain if a spill sits too long, or if the sealer has worn thin in that spot.
Quick reference

Do's and Don'ts

If you only memorize one section of this guide, make it this one.

Do

  • Sweep regularly Sand and grit are sandpaper. Removing them is half the job.
  • Use pH neutral cleaner Mild, pH neutral, labeled safe for sealed tile.
  • Use diluted ammonia correctly Keep it light. Damp microfiber mop. Dry immediately.
  • Mop lightly Saltillo wants a damp mop, not a wet one.
  • Dry after cleaning Protect the sealer and keep moisture out of the grout.
  • Use rugs and runners At every exterior door, kitchen, hallway and high-traffic path.
  • Add felt pads Under every chair, table, stool and furniture leg.
  • Lift furniture Never drag it across Saltillo.
  • Lift the bucket Carry it, or set it on a towel. Dragging it grinds grit into the sealer.
  • Turn off vacuum rollers Suction only, or a soft hard-floor attachment.
  • Keep heat away Room temperature or cool water. Heat and steam damage the sealer.
  • Keep pet nails trimmed Untrimmed nails dull and scratch the finish over time.

Don't

  • Vinegar or citrus cleaners Acidic cleaners dull and damage the finish.
  • Bleach Discolors grout, dulls sealer, eats nearby finishes.
  • Strong ammonia mixtures Straight or heavy ammonia will dull and damage the sealer.
  • Abrasive powders or scrub pads They scratch the sealer and leave dull spots.
  • Steam mops Heat and moisture force themselves into grout and under worn sealer.
  • Wax or shine sprays Build-up, uneven gloss, slipperiness and restoration trouble later.
  • Flood the floor Too much water settles into grout, edges, cracks and worn areas.
  • Drag buckets or equipment Anything dragged across the floor grinds grit into the sealer.
  • Vacuum beater bars Friction equals damage. Roller off, every time.
  • Hot water or heat appliances Cool water only. No steam, no heat.
  • Toilet, rust or lime removers Aggressive bathroom chemistry has no business on this floor.
  • Mop-and-glow products They look fine for a week, then create months of work to undo.

The sealer is what every one of these rules is protecting. Keep it intact and the tile underneath is barely asked to do anything.

Protecting High-Traffic Areas

The first places to dull are also the easiest to defend. Entryways, kitchens, hallways and the paths from exterior doors carry the most grit, water and weight.

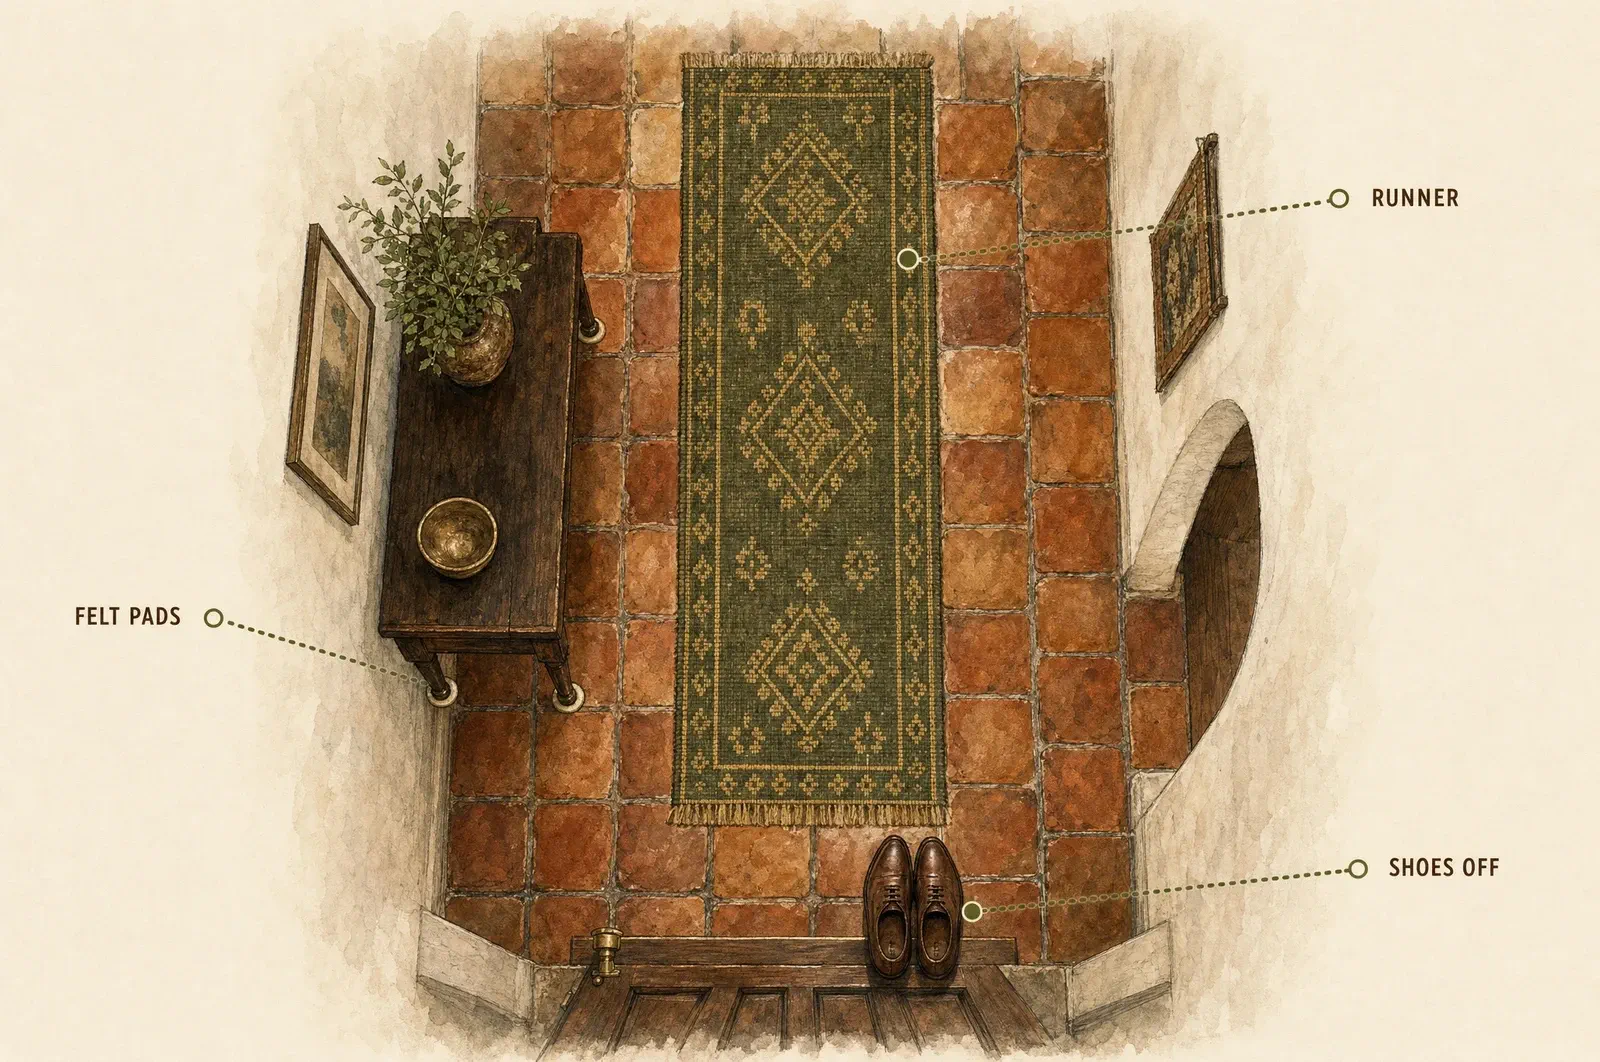
Saltillo hallway protected with a runner, felt pads under furniture and shoes at the door
A runner takes the grit, felt pads take the dragging, shoes come off at the door.
  • Rugs or runners at every entry point.
  • Breathable rug pads that will not stain or trap moisture.
  • Shake out or vacuum rugs often, and clean underneath them regularly.
  • Rotate rugs to prevent uneven wear.
  • Felt pads under every piece of furniture, refreshed when they thin out.
  • Lift furniture instead of dragging it.
  • Lift mop buckets instead of dragging them.
  • Vacuum only with the rollers turned off.

Important

Where the wear actually comes from

Sand and grit are the number one cause of dull Saltillo finishes. Stop them at the door and you stop most of the wear.

Kitchens, Baths and Wet Areas

Water is the slow enemy. Manage it deliberately.

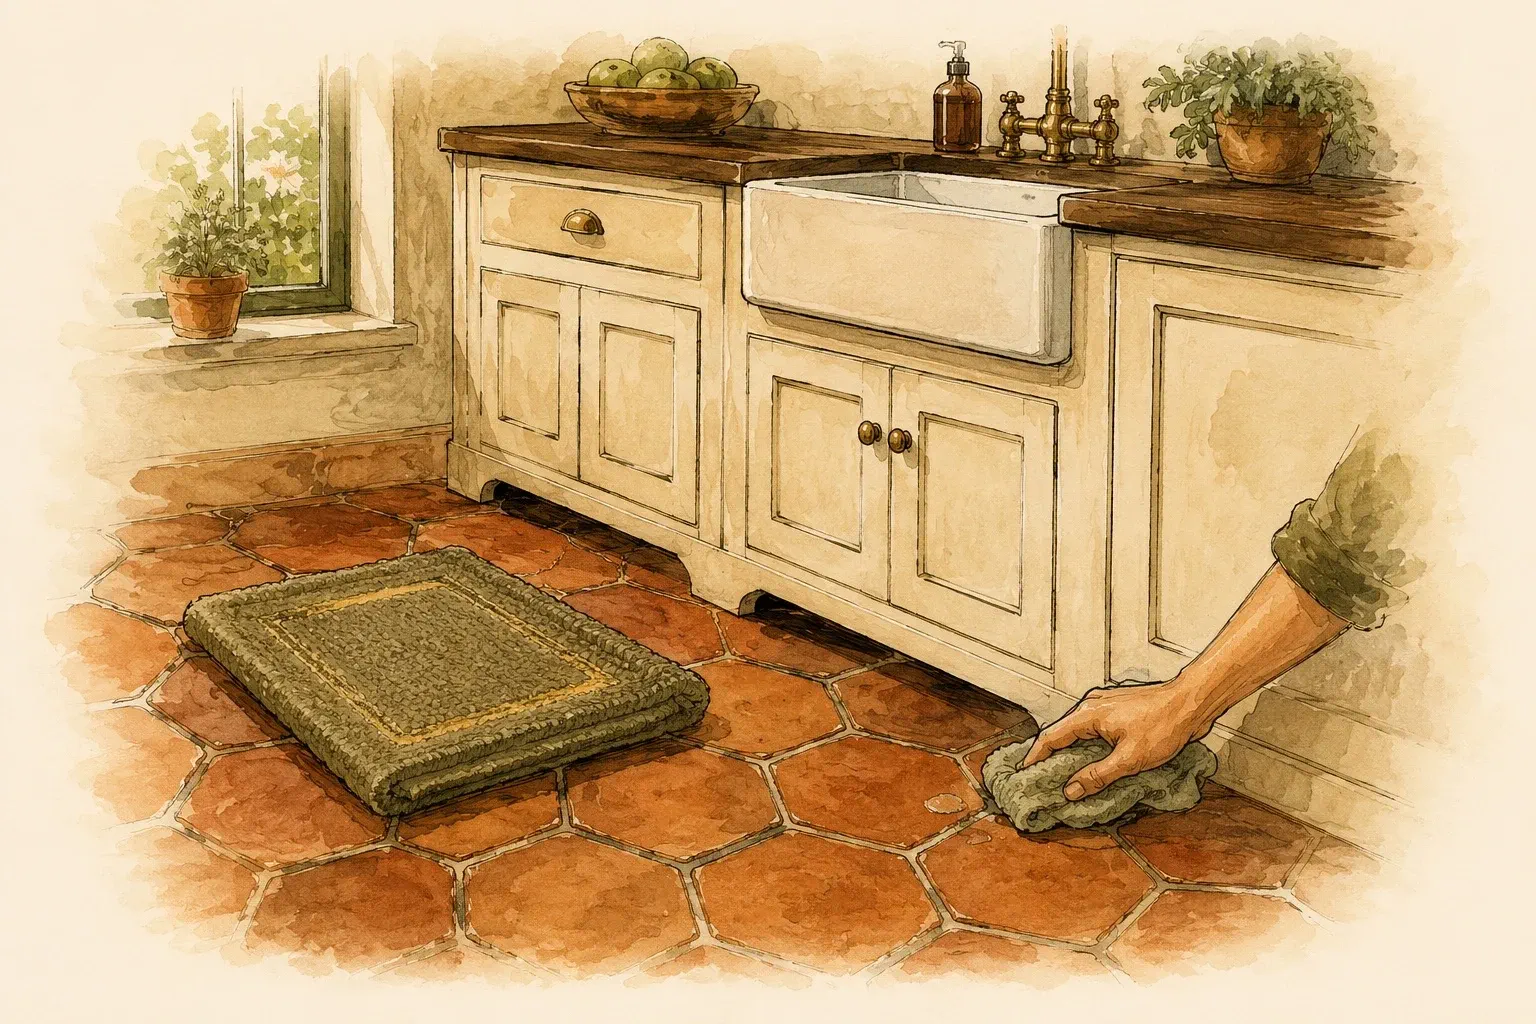
Saltillo kitchen floor with a mat in front of the sink and a cloth within reach
A small mat in front of the sink and the water drop wiped up as soon as it lands.

Kitchens

  • Wipe cooking oil and food spills quickly.
  • Keep mats near sinks and prep areas.
  • Do not leave wet towels or mats sitting on the floor.
  • Dry around appliances and water sources.

Bathrooms and wet areas

  • Keep standing water off the tile, and dry after splashes.
  • Use trays under soaps and bottles.
  • No toilet bowl cleaner, rust remover, lime remover or glass cleaner.
  • No steam and no heated cleaning appliances.

Plant pots

Do not place plant pots directly on Saltillo. Use trays or stands that allow airflow underneath and prevent moisture rings forming under the pot.

Shopping list

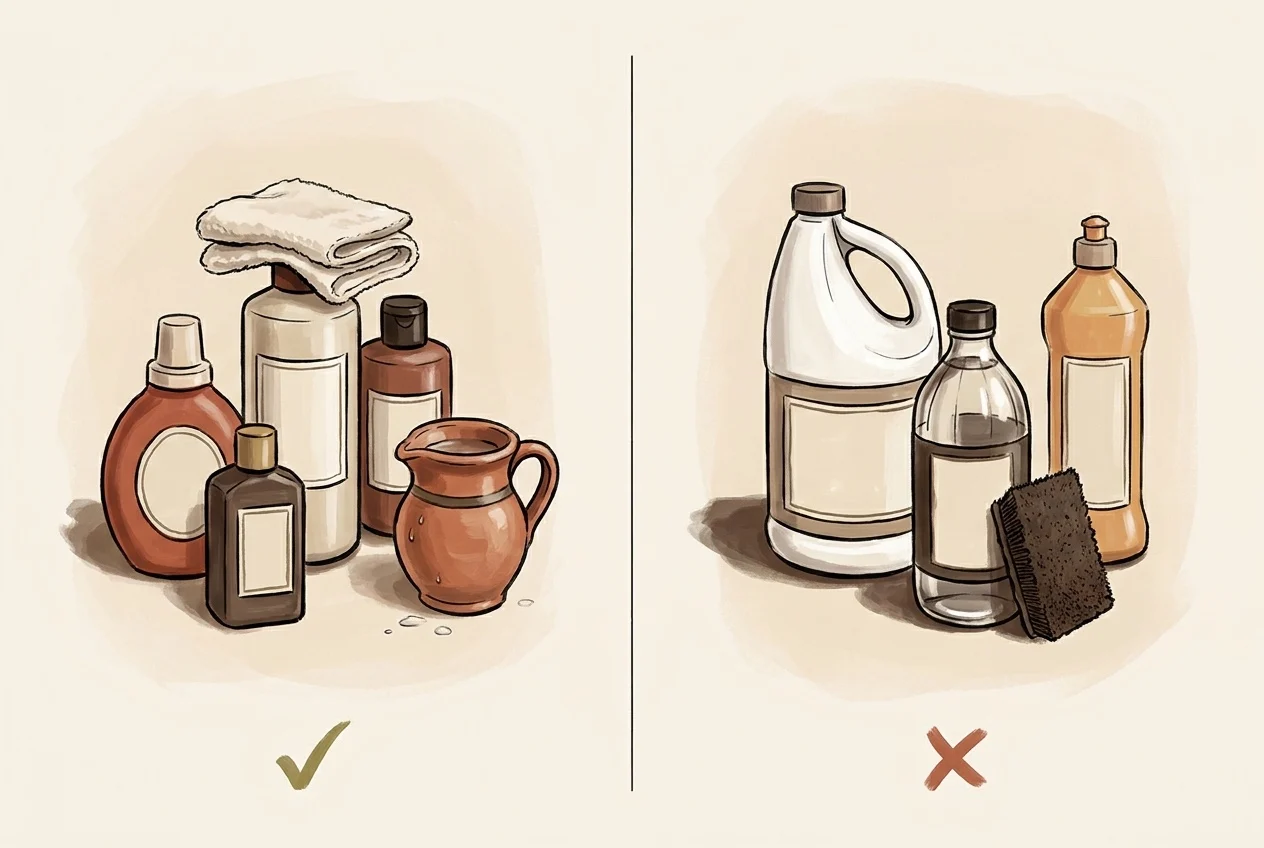
Safe and Unsafe Products

If the label does not say sealed tile, Saltillo or stone, put it back.

Safe and unsafe cleaning products for sealed Saltillo tile shown side by side
Labeled for stone or sealed tile on one side, everything aggressive on the other.

Safe

  • pH neutral tile cleaner
  • Stone-safe cleaner
  • Saltillo-safe cleaner
  • Mild, properly diluted ammonia solution
  • Microfiber mops and cloths
  • Soft brushes for grout
  • Felt pads
  • Breathable rugs and runners
  • Suction-only vacuum or soft hard-floor attachment

Unsafe

  • Vinegar
  • Lemon or citrus cleaners
  • Bleach
  • Straight ammonia or heavy ammonia mixtures
  • Harsh degreasers
  • All-purpose bathroom or kitchen sprays
  • Abrasive powders
  • Steel wool
  • Magic-eraser-style abrasive pads
  • Steam mops
  • Heated wet mops or any heat appliance
  • Vacuum beater bars or spinning rollers
  • Wax polish, shine sprays, mop-and-glow products
  • Rust, lime and calcium removers

Grout Care

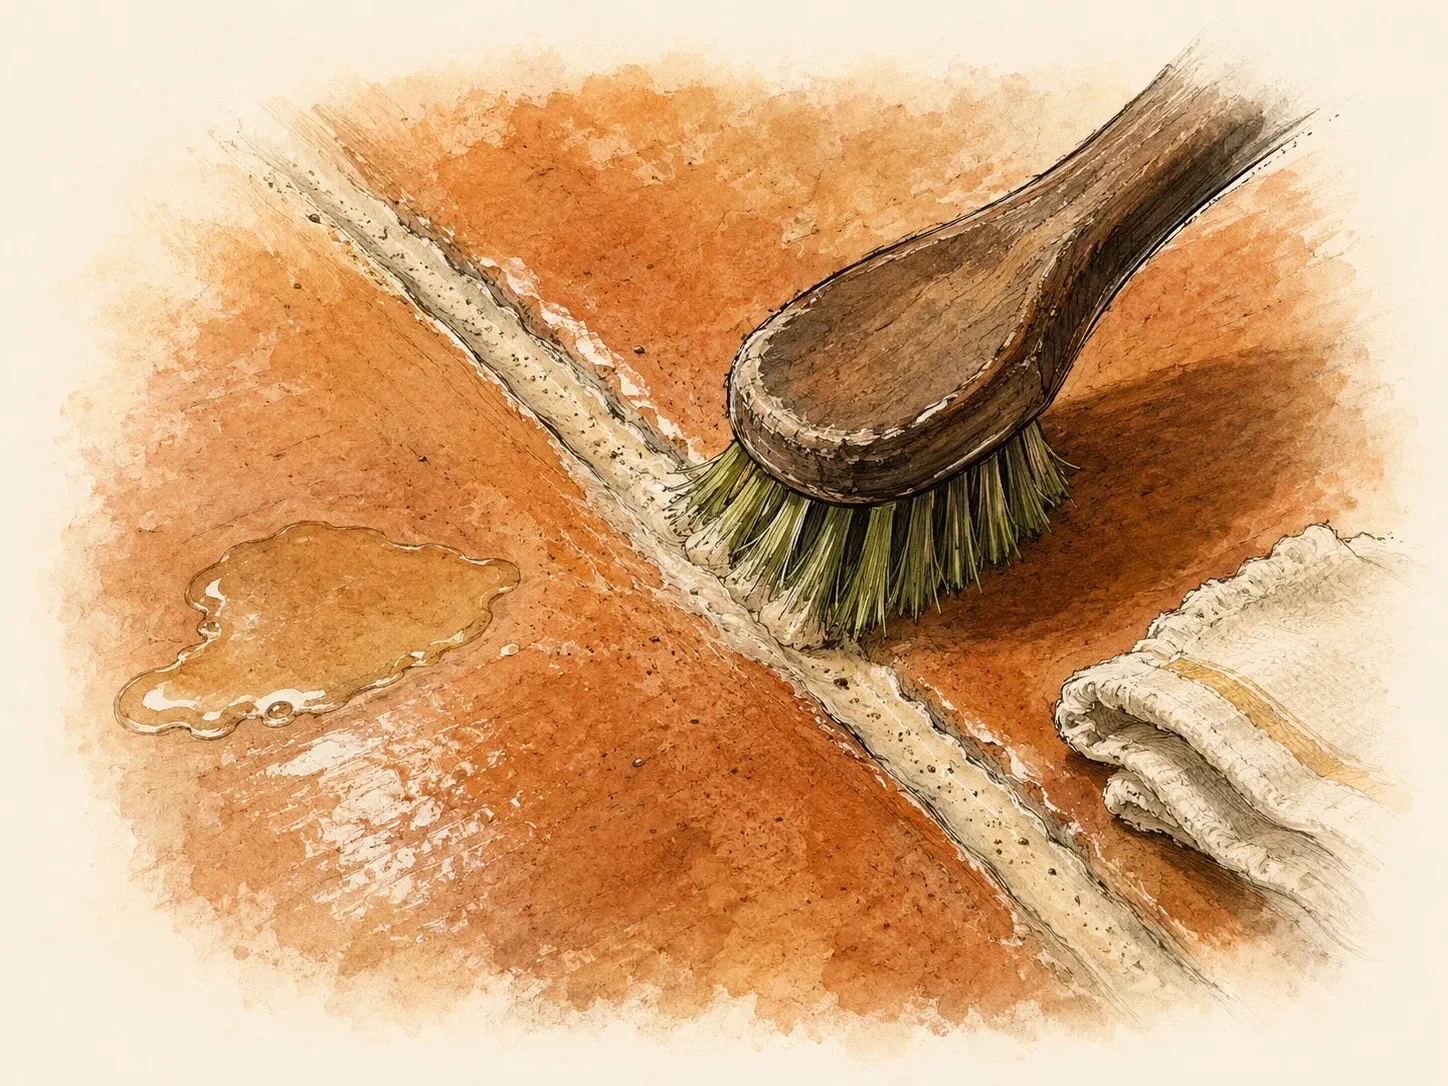
Clean the grout, spare the tile. Grout almost always looks dirty before the tile does, so clean it gently enough that the tile finish does not come along for the ride.

Soft nylon brush cleaning a Saltillo grout joint without touching the tile sealer
A soft nylon brush used patiently does almost everything a wire brush would, without taking the sealer with it.
  1. Sweep or vacuum loose dirt first.
  2. Apply a pH neutral cleaner.
  3. Let it dwell briefly.
  4. Agitate with a soft nylon brush.
  5. Wipe away the loosened soil.
  6. Rinse lightly.
  7. Dry thoroughly.

Avoid: wire brushes, harsh grout acids, bleach-heavy grout cleaners, steam cleaning, heat-based tools, and aggressive scrubbing machines unless they are being used by a professional.

Long-Term Maintenance

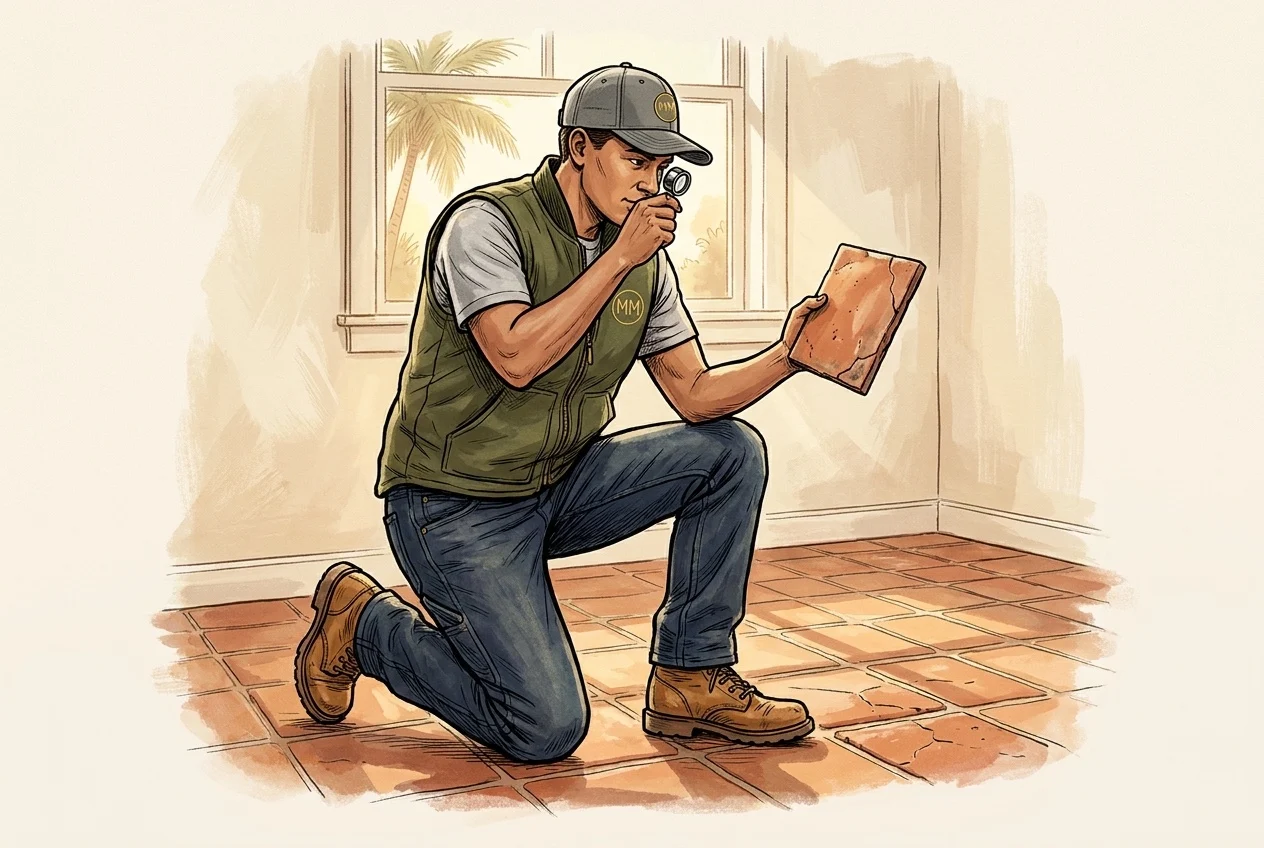
The sealer wears. That is normal. The job is to reseal before it becomes a problem rather than after. There is no avoiding the wear, but there is making it last longer, and there is calling for a reseal at the right moment.

Inspecting a Saltillo floor for the signs that it needs resealing
The two-minute inspection. The signs of sealer wear are easy to read once you know where to look.

Common signs Saltillo needs resealing:

  • The surface looks dry or patchy.
  • Water darkens the tile quickly.
  • High-traffic lanes look dull.
  • Grout stays dirty after cleaning.
  • Spills absorb faster than before.
  • The floor has uneven gloss.

Marble Mechanics can help with deep cleaning, grout cleaning, sealer evaluation, finish refresh, stripping failed coatings, resealing, stain treatment and full Saltillo restoration.

Important

Before you put anything new on the floor

Do not apply wax, shine products or store-bought coatings over Saltillo without professional guidance. The wrong product can trap dirt, create buildup, or make a future restoration much harder than it needed to be. Ask first. It costs nothing and prevents almost everything.

Common Mistakes

The short list of what we have to undo for clients most often.

  • Cleaning with vinegar.
  • Using bleach.
  • Using straight or too-strong ammonia.
  • Letting water air-dry on the tile.
  • Flooding the floor while mopping.
  • Dragging the mop bucket across the floor.
  • Vacuuming with spinning rollers or beater bars.
  • Using steam, hot water or heat-based cleaning appliances.
  • Ignoring worn sealer.
  • Using abrasive pads.
  • Dragging furniture.
  • Leaving wet rugs on the tile.
  • Placing plants directly on the floor.
  • Using wax or shine restore products.
  • Trying to fix dull spots with store-bought coatings.

Guidance on caring for sealed surfaces in general is published by the Natural Stone Institute. Marble Mechanics gives specific product recommendations after every service visit, matched to the finish actually on your floor.

Frequently asked

Saltillo Tile Care FAQ

The questions homeowners ask us most, answered before you book.

The questions Florida Saltillo owners ask most about day-to-day care.

Book an estimate
How to shine Saltillo tiles?

Look at the sheen and then at the wear. A topical sealer sits on top of the tile as a film, so it has a visible gloss or satin shine and it wears in patches where people walk, leaving dull traffic paths through a shiny floor. A penetrating sealer soaks in and leaves the tile looking matte and natural, and as it fails the tile darkens when it gets wet rather than going patchy. Most Saltillo in Florida homes is topical, which is why so much of it looks blotchy after a few years.

What is the best mop for Saltillo floors?

A flat microfiber mop, used damp and not wet, is the right tool for a sealed Saltillo floor. String mops push dirty water into the grout and leave more behind than they lift. Sponge mops drag grit across the sealer. Steam mops are the one to avoid outright: heat and forced moisture are exactly what Saltillo and its sealer do not want. Whatever the mop, the cleaner on it should be pH neutral and labeled safe for sealed tile or stone.

How to modernize Saltillo tile?

You do not have to tear it out. Most Saltillo that reads as dated is really Saltillo under decades of yellowed wax and acrylic, and stripping that back changes the whole room: the clay underneath is a warm terracotta, not the orange-brown people remember. From there the finish is a choice. A matte or satin sealer reads current, a high gloss reads traditional, and color enhancing sealers deepen the clay without turning it into a coating. Grout color is the other lever and it is often the one doing the dating.

Can you seal Saltillo tile?

On a topical sealer this is where most Saltillo floors go wrong. Coating over a worn, dirty film traps whatever is on the floor underneath the new layer, and because the old coat is uneven the new one dries uneven too. It looks worse than what you started with and it makes the eventual strip harder. When a topical finish has gone patchy, stripping is not optional.

Do Saltillo tiles need to be sealed?

Felt pads on every leg, and lift rather than drag. A topical sealer is softer than the tile beneath it, so a chair dragged across the room takes the finish off in a line even when it does not mark the clay. Breathable rugs are fine; rubber-backed mats are best avoided on sealed Saltillo because they trap moisture against the finish.

How much does it cost to remove Saltillo tile?

Removing Saltillo is the expensive option and it is usually the wrong one. The tile is set in mortar over a slab, so taking it up means demolition, hauling, slab prep and then the cost of whatever goes down next. Restoring the floor that is already there is a strip, clean and reseal, and the tile is handmade clay that cannot be bought back the same way. Get a restoration price before a removal price, because most floors people have priced for removal did not need it.

How do I clean the grout between Saltillo tiles without damaging the tile?

A soft brush and a pH neutral cleaner, worked along the joint rather than scrubbed across the tile face. The risk on a Saltillo floor is not the grout, it is what a stiff brush or an abrasive pad does to the sealer on the tile either side of it. Saltillo grout joints are usually wide and generous, which makes them easy to work along carefully.

Is Saltillo tile hard to clean?

Not once it is sealed properly, which is the whole point of the sealer. Sealed Saltillo takes a pH neutral cleaner, a damp microfiber mop and drying afterwards, and that is the routine. Unsealed or failing Saltillo is a different story: the clay is porous, so it absorbs everything and the color goes blotchy, and no amount of mopping fixes it. If your floor feels like hard work, the sealer is usually the thing that has failed rather than the tile.

Written by Oscar Tineo, Founder of Marble Mechanics, with 27+ years of stone restoration experience in Tampa Bay.